Monical's Command Center
Get the required work done faster.
Pick the task. The app guides the steps, catches bad data, and saves the proof.
Operations desk Required work, active checks, proof saved.
Live demo ready
Ready now Pick the job you are doing. Start the job, follow the prompts, and let the app catch the common mistakes before they become correction loops.
Priority queue
- PrepareGet the export and conversion worksheet right before numbers move.
- ReviewCatch missing counts, odd units, waste, and key-item variance.
- SubmitSave the packet, signatures, and audit trail in one pass.
Daily operations Do Dough Count Count dough, check waste, and keep the daily dough record moving. Live Review Review Store Submissions See submitted packets, flags, accounts, and store follow-up without chasing files. Live Executive review Show Corporate Overview Open the ownership-facing proof packet and rollout value story. Review
Pick the job to begin. Preview the live tools, or sign in to save protected store work.
Signed in
Store user
Choose a module to continue.
Inventory Protected monthly PDF
Dough Store count workspace
Food cost 11-item gauges
Admin Submissions and accounts
Monical's Command Center
Command Center
Choose the job. The session, store, and review path stay connected.
Active store Store workspace Monthly inventory, food cost, dough count, submission review, attendance, and coaching live in one place.
Daily operations Do Dough Count Handle daily dough counts, waste review, manager checks, and doughs-per-hour visibility. Live Review Review Store Submissions See submitted packets, flags, accounts, and store follow-up. Live Executive review Show Corporate Overview Open the ownership-facing overview, proof packet, and rollout value story. Review
Signed in
Store user
Choose a module to continue.
Live jobs are open now. Planned people tools stay visible so managers see what is coming next.
Inventory & Food Cost Command Center
Turn one FoodTec export into a signed inventory packet, 11-item variance report, and audit trail.
Report setup
Step 1 / 8
Signed in Store workflow
Step 1
Report setup
Start the packet with the store, reporting month, and the two people responsible for the inventory review.
Month and year for this report.
This person signs after the inventory form is finalized.
This person signs after reviewing the rendered PDF.
Corporate demo path
Show the value quickly: export guidance, conversion support, variance visibility, PDF review, signatures, and admin records.
- Uses only items that belong on the inventory PDF.
- Flags missing, duplicate, negative, and unrealistic counts before submission.
- Separates controllable waste from approved uncontrollable events.
Names entered here will flow through the inventory form, final check, PDF preview, and submission summary.
Step 2
FoodTec prep and export
Use the conversion worksheet if needed, enter those totals in FoodTec, then upload the Raw Material Cost-of-Goods export.
BIBs, dough on hand, and ORPs should already be included in FoodTec before export.
Keep a store copy of conversion math when the helpers are used.
Use Raw Material Cost-of-Goods for the full reporting month.
Before FoodTec export
Use these helpers, then enter the totals in FoodTec
These calculators are for store-side prep. They do not edit the uploaded file, and they do not change FoodTec by themselves.
- 1CountCount BIBs, dough, ORPs, and loose ingredients in the store.
- 2ConvertUse the matching helper below to get FoodTec-ready totals.
- 3EnterPut those totals into FoodTec before downloading the export.
Full BIBs are counted. Partial BIBs are weighed only.
FoodTec gets gallons for each flavor.Count dough balls and add the converted flour to loose flour.
FoodTec gets the total flour pounds.Count frozen ORPs and add the ingredient totals to the matching FoodTec items.
FoodTec gets flour, cheese, sauce, meat, and mushroom when used.BIB syrup
What to do
- Enter full 5-gallon or 3-gallon BIB counts.
- Weigh partial BIBs only. Do not guess partial gallons.
- Copy each flavor's FoodTec gallons into FoodTec before export.
The helper deducts the correct box/crate tare for partials.
Dough to flour
What to do
- Enter the loose flour you counted.
- Enter dough counts by size.
- Use the final flour total as the FoodTec flour count.
ORP ingredients
What to do
- Enter frozen oven-ready pizza counts by type.
- Add each calculated ingredient to its matching FoodTec item.
- Only export after FoodTec includes those ingredient counts.
Use this for a clean store copy after the helper totals are filled in.
Starting inventory cannot be corrected after export. Include ORPs, dough, and BIBs before downloading the FoodTec file.
Before export checklist
- Count loose ingredients throughout the store.
- Add BIB, dough, and frozen ORP conversions into FoodTec.
- Use the entire reporting month.
- Export Raw Material Cost of Goods after the count is ready.
Guided demo loads a sample FoodTec export so the full workflow can be shown without store data.
How to get the file
- Reports, then Inventory, then Raw Material Cost-of-Goods.
- Set the full reporting month, frequency All, and department All.
- Use the export button and download the CSV file from FoodTec.
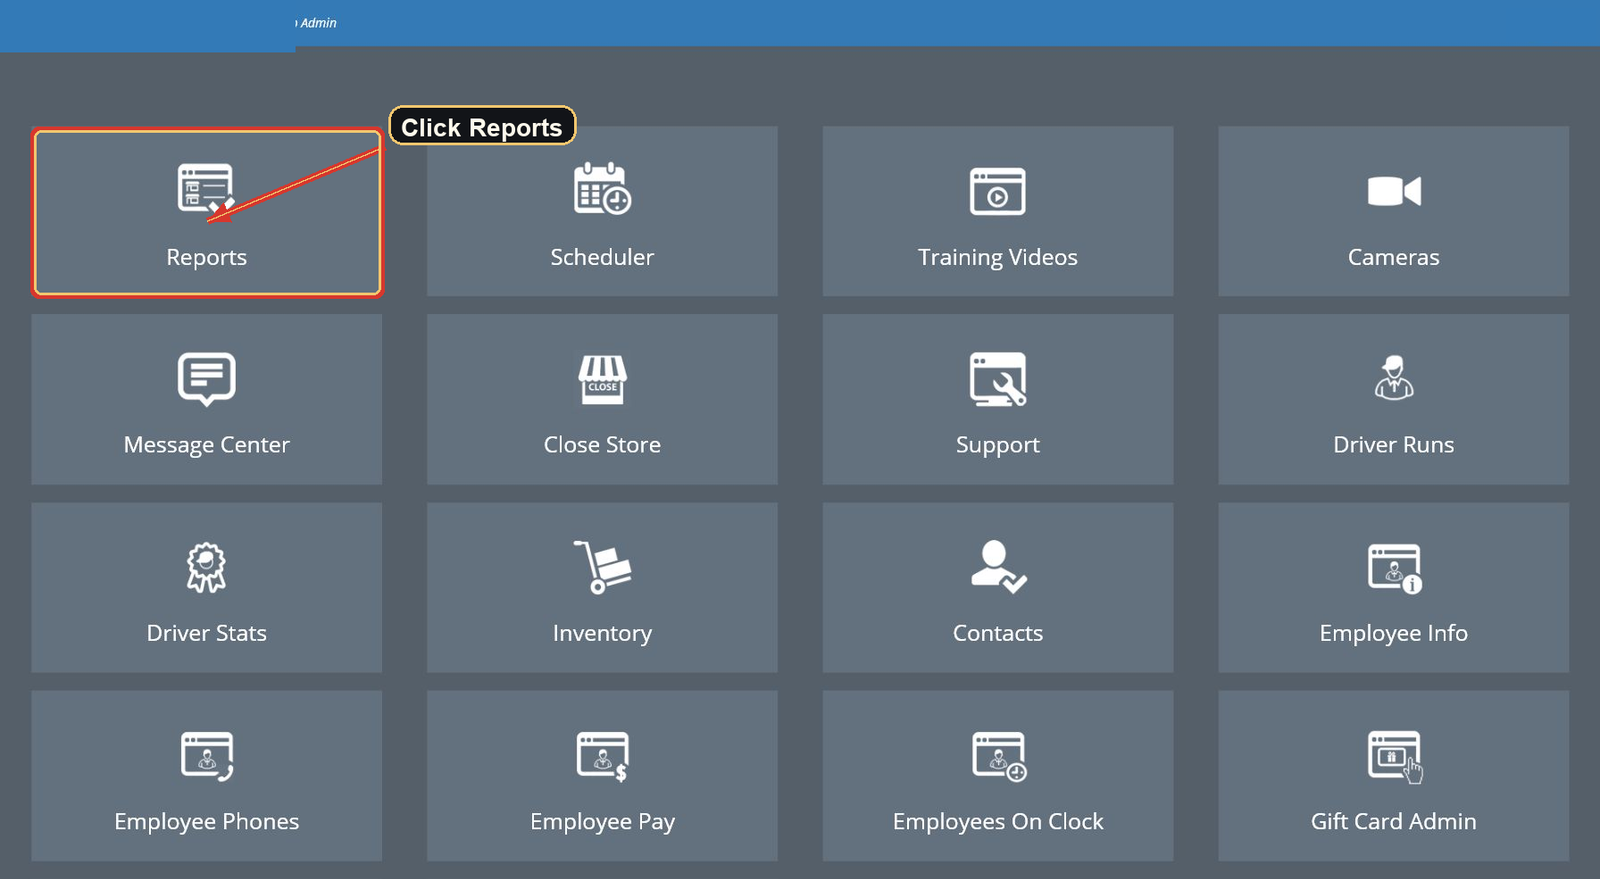
Step 01 Open Reports
After login, choose Reports from the FoodTec home screen.
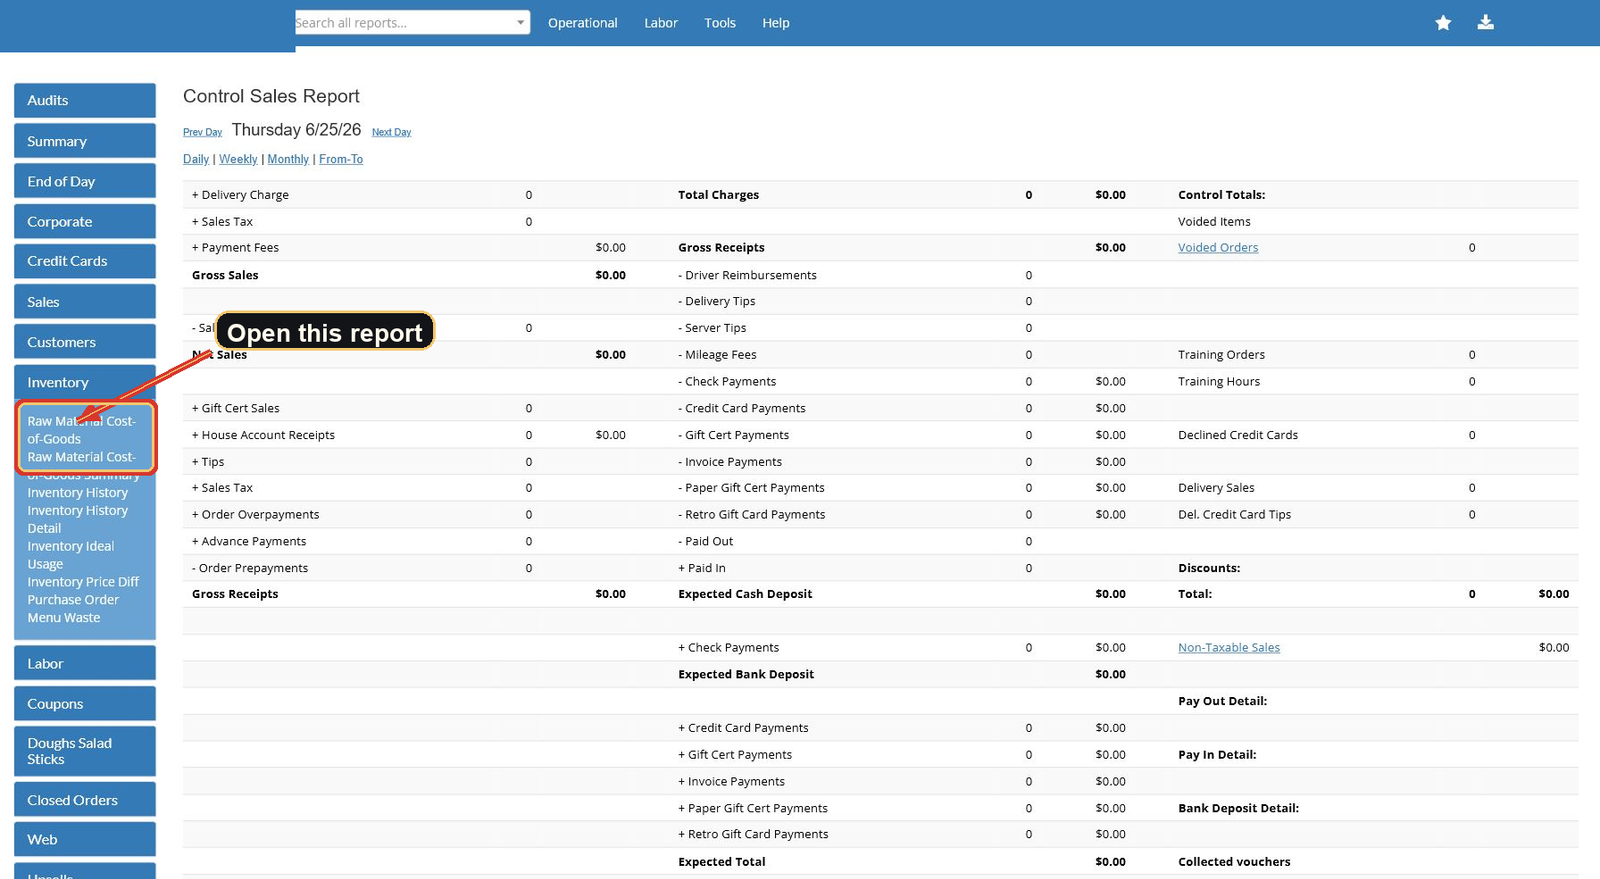
Step 02 Find Inventory reports
Open the Inventory category and choose Raw Material Cost-of-Goods.
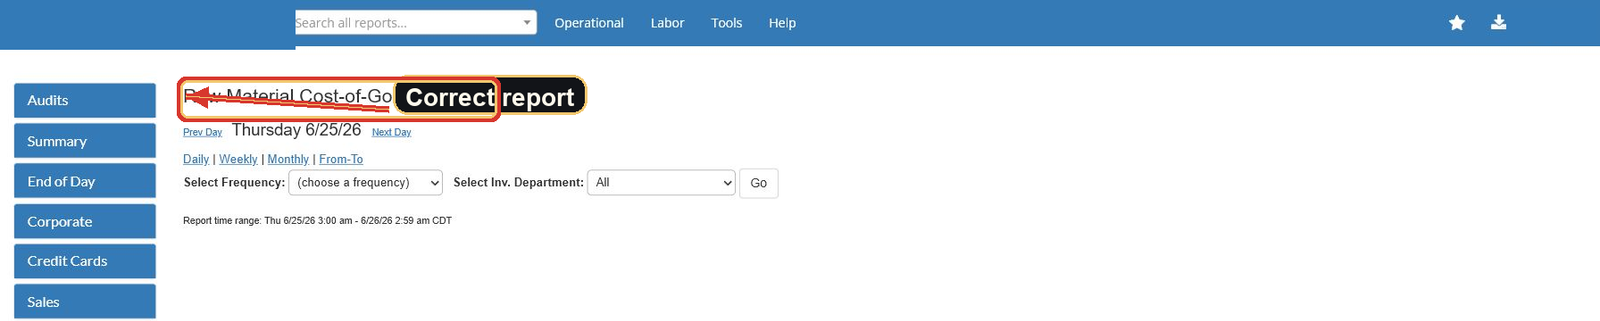
Step 03 Open Raw Material Cost-of-Goods
This is the report the app needs. Do not use the summary version.

Step 04 Set the month
Use the first day through the last day of the month being reported.
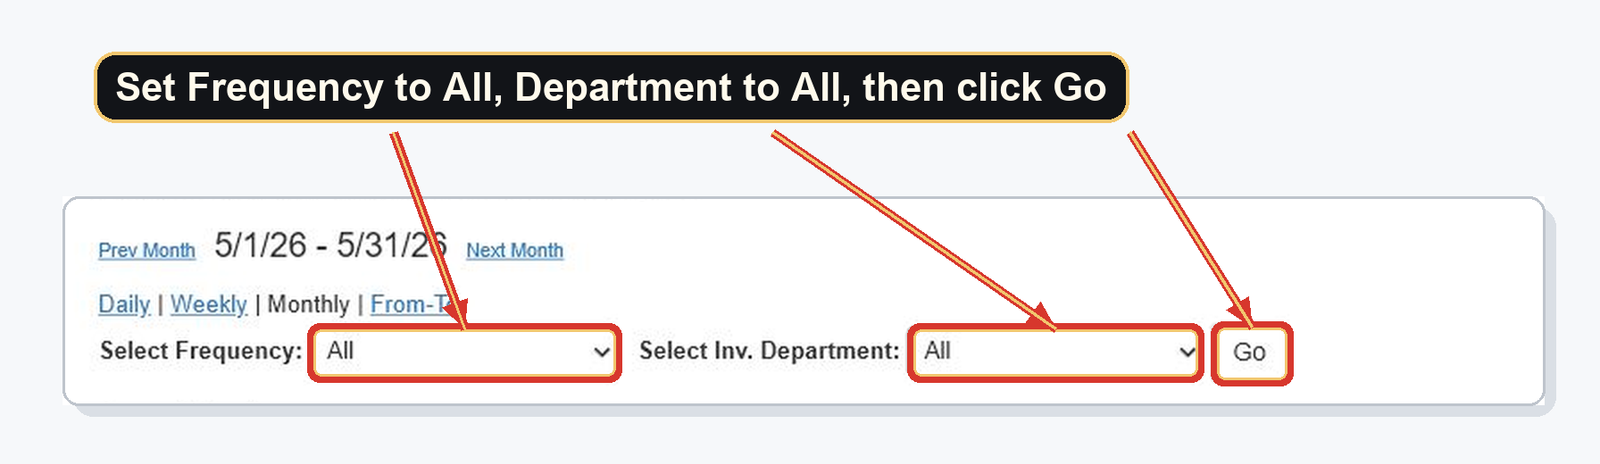
Step 05 Choose All
Set frequency to All and department to All, then run the report.

Step 06 Export CSV
Use the download icon, choose Export CSV, then upload that file here.
Items not printed on the inventory PDF are ignored.
Step 3
Uncontrollable waste
Before the 11-item numbers are reviewed, report any key-item waste that was outside store control.
Record all waste in FoodTec first under menu waste or inventory waste. This step only separates uncontrollable waste from controllable waste on the worksheet.
Step 4
Food cost target gauges
Review the 11-item Target Gauge, waste percentage, data checks, and source rows before moving to the inventory form.
This screen can stand on its own for food-cost reporting, or continue forward for end-of-month PDF reporting.
Step 5
Verify inventory form
Upload an export first.
Start with items that need attention. Enter missing counts or ignore lines you do not want filled.
Ready 0
Needs review 0
Missing counts 0
Ignored 0
| Form | Form item | Count | Status | Source / issue |
|---|
Step 6
Final inventory check
Review the audit summary after the inventory lines are finalized. The person who collected inventory signs before the PDF is rendered.
Signature warning
Do not sign this step until the inventory lines look ready. This signature is saved with the packet as the store's record that the count was prepared for PDF review.
StoreNot entered
MonthNot entered
Taken byNot entered
Verified byNot entered
Inventory linesNot checked yet
Needs attentionNot checked yet
Skipped blanksNot checked yet
Review file notesNot checked yet
Ignored extra notesNot checked yet
Uncontrollable wasteNot answered
PDF previewNot generated
Email recipientaustinculp6956@gmail.com
Inventory taker Not entered Printed name was entered during report setup.
Taken by signature
Final review required
Scroll through the PDF above, including the worksheet pages, before continuing.
Verifier warning
Only sign after the rendered PDF has been reviewed. This signature means the packet was checked and is ready for submission.
Verifier Not entered Printed name was entered during report setup.
Verified by signature
Step 8
Submit signed packet
The inventory was signed before rendering, and the verifier signed after reviewing the PDF. Submit to create the final signed packet.
Collector Not entered
Verifier Not entered
PDF review Not approved
Submission review Packet, variance, and waste proof
This is the executive view before the final PDF is submitted.PDF packet Inventory preview
Not generatedCreate and approve a PDF preview first.
Food-cost signals 11-item controls